LED CANOPY
THE LED CANOPY FIXTURE CAN BE USED FOR INDOOR OR OUTDOOR LIGHTING.
ITS GREAT FOR ANY OVERHANG OVER A WALKWAY OR LIGHTING UNDERNEATH A PAVILION OF ANY SIZE.
THEY ARE WARRANTIED FOR 5 YEARS AND COME WITH OPTIONS IN 20, 30 OR 55 WATT OPTIONS.
THE BASE MODELS WORK 120-277 VOLT SYSTEMS WITH OPTIONS FOR A 480 VOLT DRIVER.
THEY CAN BE ON A MANUAL SWITCH, APP-CONTROLLED POWER SWITCH FOR EASE OF USE, OR CAN BE EQUIPPED WITH A PHOTOCELL FOR DUSK TO DAWN USE.
DOWNLOAD THE SPEC FOR MORE INFORMATION.
FOR ANY MORE QUESTIONS GIVE US A CALL AT 1-833-725-2658
Installation

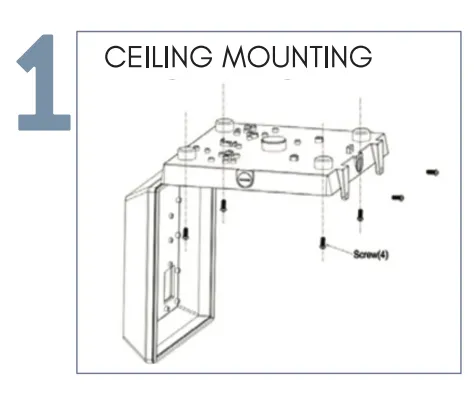
Ceiling Mounting
1. Determine the optimal location on the ceiling for mounting the LED canopy light fixture. Ensure it is centered and provides the desired illumination coverage. Verify that the ceiling structure is suitable and can support the weight of the fixture.
2. Attach the provided ceiling mounting bracket to the ceiling structure. This typically involves attaching a ceiling plate or base plate to the ceiling using suitable anchors or hardware. Ensure that the bracket is level and securely anchored.
3. Attach the LED canopy light fixture to the mounting bracket. Most fixtures have a backplate or mounting plate that aligns with the bracket. Secure the fixture in place using screws or other provided fasteners.
4. Connect the electrical wires from the ceiling to the LED canopy light fixture. Typically, these fixtures have three wires: live (black or red), neutral (white), and ground (green or bare). Follow the wiring diagram or instructions. Secure the wires using wire nuts to create safe and reliable connections.

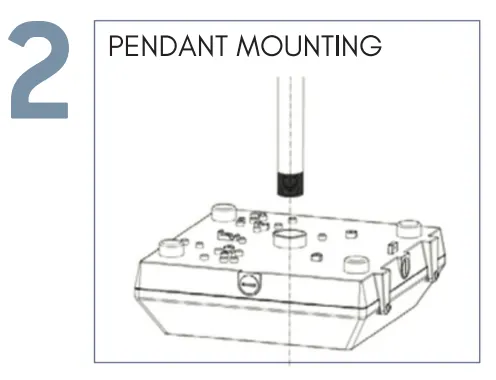
Pendant Mounting
1. Install the pendant mounting hardware on the ceiling structure. This typically involves attaching a ceiling plate or base plate to the ceiling using suitable anchors or hardware. Ensure that the pendant mounting hardware is level and securely anchored.
2. Hang the LED canopy light fixture from the pendant mounting hardware. Ensure that the fixture is securely in place and level. Most fixtures have a threaded nipple or hook on the top for easy attachment to the pendant.
3. Connect the electrical wires from the ceiling to the LED canopy light fixture. Typically, these fixtures have three wires: live (black or red), neutral (white), and ground (green or bare). Follow the wiring diagram or instructions. Secure the wires using wire nuts to create safe and reliable connections.
4. Test the LED canopy light to ensure it functions correctly. Check for any flickering or irregularities in the lighting. If issues arise, double-check the wiring connections and power supply.

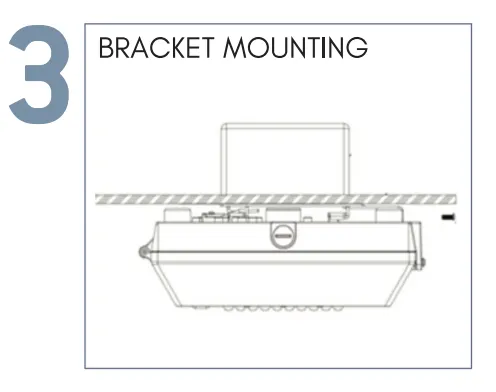
Bracket Mounting
1. Attach the provided mounting bracket to the ceiling structure. This typically involves attaching a ceiling plate or base plate to the ceiling using suitable anchors or hardware. Ensure that the bracket is level and securely anchored.
2.Attach the LED canopy light fixture to the mounting bracket. Most fixtures have a backplate or mounting plate that aligns with the bracket. Secure the fixture in place using screws or other provided fasteners.
3. Connect the electrical wires from the ceiling to the LED canopy light fixture. Typically, these fixtures have three wires: live (black or red), neutral (white), and ground (green or bare). Follow the wiring diagram or instructions. Secure the wires using wire nuts to create safe and reliable connections.
4. Test the LED canopy light to ensure it functions correctly. Check for any flickering or irregularities in the lighting. If issues arise, double-check the wiring connections and power supply.


